How to Hang Artwork Like a Professional Interior Designer
In this guide, we’ll explore how to hang artwork like a professional interior designer and whether the expert methods used in interior design.

Hanging artwork can make or break the visual harmony of a space. If you’ve ever walked into a home and been struck by how effortlessly the wall art ties everything together, you’ve likely admired the work of a professional interior designer. The truth is, mastering the art of displaying artwork isn’t just about hammering nails into a wall—there’s a method, an eye, and a strategy behind it. In this guide, we’ll explore how to hang artwork like a professional interior designer and whether the expert methods used in interior design are worth the hype.
Why Does Proper Artwork Placement Matter?
Before diving into how to hang artwork like a professional interior designer, let’s address the “why.” Hang Artwork Like a Professional Interior Designer is more than decoration—it’s a design statement. It defines spaces, enhances aesthetics, creates mood, and communicates personality.
Key Benefits of Proper Art Placement:
- Creates Visual Balance: Artwork hung at the wrong height can throw off a room’s equilibrium. Proper placement ensures harmony.
- Enhances Architectural Features: Art can complement architectural details like fireplaces, windows, or molding.
- Boosts Interior Design Cohesion: When done right, it ties together colors, textures, and furniture pieces.
- Personal Expression: Your choice and arrangement of art say a lot about your personality and taste.
How to Hang Artwork Like a Professional Interior Designer
Ready to transform your walls? Here’s how to approach it like a seasoned designer, from planning to execution.
1. Start with a Vision and Purpose
Before reaching for the hammer, ask yourself:
- What feeling do I want this room to evoke?
- What is the focal point of the space?
- Do I want a gallery wall or a single statement piece?
Interior designers begin with a clear vision. For example, in a minimalist room, they might opt for one large piece with clean lines. In contrast, an eclectic room could support a more diverse gallery wall.
2. Choose the Right Artwork for the Space
Different spaces serve different functions, and the artwork should reflect that. For example:
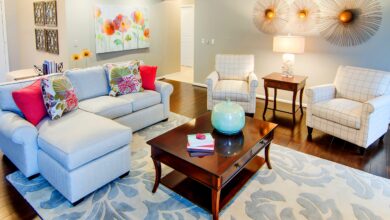
- Living Room: Statement pieces, bold prints, family photos, or large-scale abstract works.
- Bedroom: Soothing tones, romantic themes, soft landscapes.
- Hallways & Staircases: Series or gallery walls, black-and-white photography.
- Dining Room: Conversational pieces or seasonal rotating art.
A professional interior designer matches art to room function, color palette, and mood.

Pro Tip: Keep scale in mind—oversized art overwhelms small rooms, while tiny pieces may look lost on expansive walls.
3. Understand Ideal Hanging Heights
This is where many homeowners go wrong. A common rule used by interior designers is to hang art so the center is at eye level—around 57 to 60 inches from the floor. However, there are exceptions:
- Above Furniture: Hang the bottom of the artwork 6-10 inches above the top of furniture like sofas or headboards.
- In Groupings: Treat the collection as one whole piece and center it as a unit.
- In Hallways or Standing View Areas: Slightly higher placement might be more appropriate.
When learning how to hang artwork like a professional interior designer, height is crucial.
4. Create a Layout Before You Hang
Don’t skip this step. Interior designers never “eyeball it”—they plan.
Try This:
- Cut paper templates in the size of each piece and tape them to the wall.
- Use painter’s tape to outline groupings or alignments.
- Photograph different arrangements to visualize options.
Creating a mock layout helps avoid unnecessary holes and ensures a curated, designer-approved look.
5. Consider Frame Styles and Mats
Frames are more than borders—they’re part of the visual impact. Interior designers treat framing as a design element.
Frame Choices:
- Minimalist rooms: Thin metal or wood frames, monochrome mats.
- Traditional spaces: Ornate, gold-leaf or wood-carved frames.
- Eclectic or boho styles: Mismatched frames, colorful mats, or DIY vintage styles.
Matting can also elevate the art by creating visual breathing room.
Pro Tip: Keep consistency in mat width and color for a unified gallery wall.
6. Use the Right Hardware and Tools
A professional look is as much about precision as it is about the art itself.
Must-Have Tools:
- Level (or laser level)
- Tape measure
- Stud finder (especially for heavy pieces)
- Picture-hanging hooks (weight-rated)
- Command strips (for lightweight or temporary setups)
Interior designers often use double-anchor systems for stability and symmetry, ensuring frames don’t tilt.
7. Think in Groupings and Themes
Gallery walls are hugely popular—and for good reason. Done right, they’re visually stunning and deeply personal.
Tips for a Balanced Gallery Wall:
- Choose a theme (e.g., family, travel, botanicals).
- Align at the center or base, not just top or bottom.
- Keep spacing consistent (2–3 inches is ideal).
- Mix frame sizes but maintain cohesion with color or matting.
This is a cornerstone tip for anyone learning how to hang artwork like a professional interior designer—grouping with intention creates sophistication.
8. Adjust for Light and Room Function
Lighting makes or breaks artwork. Designers use both natural and artificial lighting to enhance art.
- Avoid direct sunlight, which can cause fading.
- Use picture lights, track lighting, or accent sconces for dramatic effect.
- In dim rooms, install LED strips above or below framed works.
Also, think about functionality—you don’t want glare in TV rooms or distractions in study spaces.
9. Update and Rotate Seasonally
Interior designers don’t treat wall art as permanent. Instead, they update it seasonally or with design shifts.
- Swap prints or photographs based on holidays, seasons, or mood.
- Keep a “rotation collection” to refresh your look.
- Lean artwork on mantels or floating shelves for a more casual, changeable aesthetic.
This strategy keeps your space feeling fresh and avoids design fatigue.
Are Professional Techniques Worth the Hype?
You might be wondering—do I really need to go to these lengths? Isn’t art just… art?
Yes and no.
Why the Hype is Justified:
- Increased property value: Well-designed interiors with correctly hung art photograph beautifully and can increase resale value.
- Emotional connection: Thoughtfully arranged art creates deeper connection to your home.
- Polished look: Even budget art feels elevated when displayed like a pro.
- Improved aesthetics: Your home simply looks better—and you enjoy it more.
Interior designers are trained in spatial relationships, color theory, and styling principles. Emulating their techniques brings undeniable transformation to any room.
Final Thoughts
Learning how to hang artwork like a professional interior designer is about more than decoration—it’s about storytelling, design cohesion, and elevating your space. Whether you’re curating a gallery wall, spotlighting a single painting, or rotating art with the seasons, taking the extra time to do it like the pros is absolutely worth the hype.
Don’t just decorate—design.
Recap Checklist: Hang Art Like a Pro
- ✅ Start with a vision
- ✅ Match art to room mood and size
- ✅ Hang at eye level (57–60 inches from the floor)
- ✅ Plan with templates or mockups
- ✅ Use cohesive frames and mats
- ✅ Invest in quality hanging tools
- ✅ Light your art well
- ✅ Keep the collection fresh
By following these professional tips, you’ll be turning blank walls into curated masterpieces in no time. Whether you’re decorating your first apartment or upgrading your forever home, embracing these design principles will set your space apart.