How to Make Your Own Statement Lighting on a Budget
In this comprehensive guide, we’ll explore how to make your own statement lighting with creative, cost-effective ways to craft stunning DIY lighting fixtures.
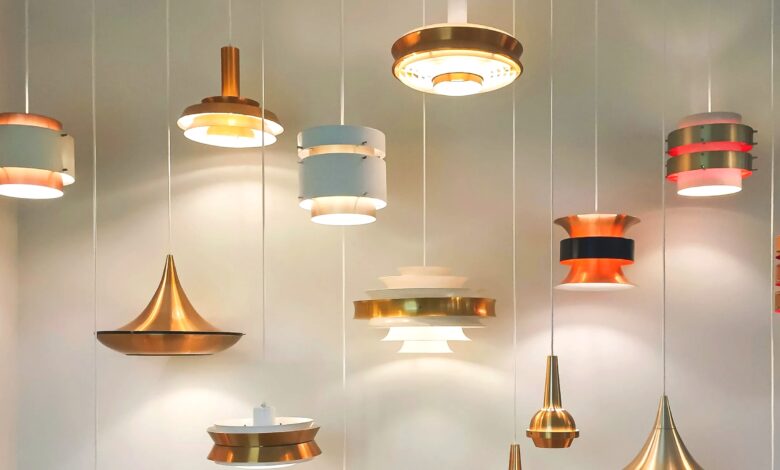
Lighting is one of the most transformative elements in interior design. A well-placed, eye-catching fixture can elevate a room, add personality, and create a focal point that ties the entire space together. However, statement lighting often comes with a hefty price tag, making it seem out of reach for those on a budget. The good news? You can make your own statement lighting without breaking the bank. In this comprehensive guide, we’ll explore creative, cost-effective ways to craft stunning DIY lighting fixtures that add flair to your home. From upcycled materials to affordable supplies, we’ll cover everything you need to know to make your own statement lighting that’s both stylish and budget-friendly.
Why Statement Lighting Matters in Home Decor
Before diving into how to make your own statement lighting, let’s understand why it’s worth the effort. Statement lighting serves as both a functional and decorative element. It illuminates your space while acting as a conversation piece that reflects your personal style. Whether it’s a bold chandelier, a sculptural pendant, or a modern floor lamp, statement lighting can:
- Define the room’s aesthetic: A unique fixture can set the tone for your decor, whether it’s bohemian, industrial, or minimalist.
- Enhance ambiance: The right lighting creates warmth, drama, or tranquility, depending on your design goals.
- Maximize small spaces: In compact rooms, a striking light fixture can draw the eye upward, making the space feel larger.
- Add value: Custom lighting can make your home feel luxurious without the high-end price tag.
The challenge lies in achieving this look affordably. By choosing to make your own statement lighting, you can customize designs to suit your taste while keeping costs low. Let’s explore how to do it.
Planning Your DIY Statement Lighting Project
To successfully make your own statement lighting, start with a clear plan. Here are the key steps to get started:
1. Define Your Style and Space
Consider the room where your lighting will be installed. Is it a dining room needing a dramatic chandelier, a bedroom craving a cozy pendant, or a living room that could use a bold floor lamp? Your style—be it modern, rustic, industrial, or eclectic—will guide your material choices and design.
2. Set a Budget
One of the biggest advantages of choosing to make your own statement lighting is cost savings. Decide how much you’re willing to spend. Most projects in this guide can be completed for $10–$50, depending on the materials you already have or can source inexpensively.
3. Assess Your Skill Level
Some projects require basic tools like a screwdriver or hot glue gun, while others might involve simple wiring. Be honest about your DIY skills and choose a project that matches your comfort level. If you’re new to electrical work, stick to projects that use pre-made lamp kits or battery-operated lights.


4. Gather Inspiration
Browse platforms like Pinterest, Instagram, or home decor blogs for ideas. Search for terms like “DIY statement lighting” or “budget-friendly light fixtures” to find designs that resonate with you. Save images of fixtures that catch your eye to guide your project.
Materials for Budget-Friendly Statement Lighting
To make your own statement lighting, you’ll need affordable, accessible materials. Here are some budget-friendly options to consider:
- Upcycled Items: Thrifted baskets, old mason jars, wine bottles, or wooden crates can be transformed into unique fixtures.
- Hardware Store Finds: PVC pipes, copper fittings, or galvanized metal can create an industrial vibe.
- Craft Supplies: Rope, twine, beads, or fabric scraps add texture and personality.
- Lighting Kits: Affordable pendant light kits or LED puck lights simplify the electrical component.
- Natural Elements: Branches, driftwood, or stones can create organic, rustic designs.
Pro Tip: Shop at thrift stores, dollar stores, or online marketplaces like eBay or Facebook Marketplace to find materials at a fraction of retail costs.
5 DIY Statement Lighting Projects to Try
Here are five detailed projects to help you make your own statement lighting. Each includes step-by-step instructions, estimated costs, and tips for customization.
Project 1: Mason Jar Chandelier
Cost: $20–$40
Skill Level: Beginner to Intermediate
Style: Rustic, Farmhouse
Mason jars are a versatile and affordable base for creating a stunning chandelier. Here’s how to make your own statement lighting with mason jars:
Materials
- 6–8 mason jars (various sizes for visual interest)
- Pendant light kit or Edison bulb sockets
- Wooden plank or metal frame
- Spray paint (optional)
- Screws, wire, and basic tools
- LED bulbs (for safety and energy efficiency)
Steps
- Prepare the Base: Sand and paint the wooden plank or metal frame in a color that matches your decor. This will serve as the chandelier’s ceiling mount.
- Attach Sockets: Secure the pendant light sockets to the underside of the plank or frame, spacing them evenly.
- Add Mason Jars: Drill a hole in each mason jar lid to thread the socket through. Screw the jars onto the lids, ensuring a tight fit.
- Wire the Fixture: Follow the pendant light kit instructions to connect the sockets to the main power source. If you’re not comfortable with wiring, consult an electrician.
- Hang the Chandelier: Secure the plank or frame to the ceiling using appropriate hardware. Insert LED bulbs and test the fixture.
Customization Tips
- Paint the jars with frosted glass spray paint for a diffused glow.
- Use colored bulbs for a playful effect.
- Cluster jars at different heights for a dynamic look.
This project is perfect for a dining room or kitchen, adding a rustic charm that’s both functional and eye-catching.
Project 2: Rope-Wrapped Pendant Light
Cost: $15–$30
Skill Level: Beginner
Style: Bohemian, Coastal
Rope is an affordable material that adds texture and warmth. Here’s how to make your own statement lighting with a rope-wrapped pendant:
Materials
- Inflatable beach ball or balloon
- Sisal or jute rope
- Pendant light kit
- Hot glue gun
- Scissors
- LED bulb
Steps
- Create the Mold: Inflate the beach ball or balloon to your desired pendant size.
- Wrap the Rope: Apply hot glue to the rope and wrap it tightly around the ball, leaving a small opening for the bulb. Overlap the rope for a woven look.
- Let it Dry: Allow the glue to set for 24 hours.
- Deflate the Mold: Pop the balloon or deflate the beach ball and remove it carefully.
- Install the Light: Thread the pendant light kit through the opening and secure it. Add an LED bulb.
- Hang the Pendant: Attach the fixture to the ceiling using the kit’s hardware.
Customization Tips
- Stain the rope with tea or coffee for a vintage look.
- Add beads or shells for a coastal vibe.
- Use multiple pendants in a cluster for a bold statement.
This project is ideal for a bedroom or living room, offering a bohemian touch that’s both chic and affordable.
Project 3: Industrial Pipe Floor Lamp
Cost: $30–$50
Skill Level: Intermediate
Style: Industrial, Modern
For an urban, edgy vibe, use plumbing pipes to make your own statement lighting. This floor lamp is perfect for a living room or office.
Materials
- Galvanized steel pipes and fittings (available at hardware stores)
- Lamp socket and cord
- Wooden or metal base
- Spray paint (optional)
- Tools: wrench, screwdriver
- Edison bulb
Steps
- Design the Structure: Sketch a simple lamp structure using pipes and fittings. A common design includes a vertical pipe with a few elbows for an arm-like extension.
- Assemble the Pipes: Connect the pipes and fittings, tightening with a wrench. Ensure the structure is stable.
- Attach the Base: Secure the pipe structure to the base using screws or adhesive.
- Wire the Lamp: Thread the lamp cord through the pipes to the socket. Connect the socket according to the kit’s instructions.
- Add Finishing Touches: Spray paint the pipes for a polished look (black or copper works well). Insert an Edison bulb.
- Test and Place: Plug in the lamp and test it before placing it in your space.
Customization Tips
- Use copper pipes for a warmer tone.
- Add a dimmer switch for adjustable lighting.
- Incorporate a concrete base for a modern twist.
This floor lamp adds an industrial edge while being surprisingly affordable to create.
Project 4: Driftwood Chandelier
Cost: $10–$25
Skill Level: Beginner
Style: Rustic, Organic
For a natural, earthy aesthetic, use driftwood to make your own statement lighting. This chandelier is perfect for a coastal or rustic home.
Materials
- Driftwood pieces (collected or purchased)
- Pendant light kit
- Twine or fishing line
- Hot glue gun
- LED fairy lights or bulb
Steps
- Select Driftwood: Choose pieces with interesting shapes and textures. Clean and dry them thoroughly.
- Create the Frame: Arrange the driftwood in a circular or cascading shape, securing pieces with twine or hot glue.
- Add Lighting: Wrap fairy lights around the driftwood or attach a pendant light kit for a single bulb.
- Hang the Chandelier: Use fishing line or twine to suspend the fixture from the ceiling.
- Test the Lights: Ensure the lights work and adjust the arrangement as needed.
Customization Tips
- Stain the driftwood for a darker finish.
- Add seashells or glass beads for extra texture.
- Use battery-operated lights for easy installation.
This project brings nature indoors, creating a stunning focal point for any room.
Project 5: Geometric Wire Pendant
Cost: $15–$35
Skill Level: Intermediate
Style: Modern, Minimalist
Geometric shapes are trendy and versatile. Here’s how to make your own statement lighting with a wire pendant:
Materials
- Wire mesh or chicken wire
- Wire cutters and pliers
- Pendant light kit
- Spray paint
- LED bulb
Steps
- Cut the Wire: Use wire cutters to shape the mesh into a geometric form (e.g., a cube, sphere, or hexagon).
- Form the Shape: Bend and secure the wire using pliers, creating a sturdy frame.
- Paint the Frame: Spray paint the wire in a bold color like gold, black, or white.
- Install the Light: Attach the pendant light kit to the top of the frame, ensuring the bulb sits securely inside.
- Hang the Pendant: Use the kit’s hardware to hang the fixture from the ceiling.
Customization Tips
- Combine multiple geometric shapes for a layered look.
- Use metallic paint for a luxurious finish.
- Add a fabric shade inside for a softer glow.
This pendant is perfect for a modern dining room or office, offering a sleek, contemporary vibe.
Safety Tips for DIY Lighting Projects
When you make your own statement lighting, safety is paramount, especially when working with electrical components. Follow these guidelines:
- Use LED Bulbs: They’re energy-efficient and produce less heat, reducing fire risks.
- Check Wiring: Ensure all connections are secure and follow the instructions provided with your light kit. If you’re unsure, consult a professional electrician.
- Avoid Flammable Materials: Keep fabric, paper, or other flammable items away from bulbs.
- Test Before Installing: Always test your fixture before permanently installing it.
- Secure Fixtures: Use appropriate ceiling or floor mounts to prevent fixtures from falling.
Where to Find Affordable Materials
To keep costs low when you make your own statement lighting, source materials strategically:
- Thrift Stores: Find unique items like baskets, jars, or frames for upcycling.
- Hardware Stores: Look for clearance pipes, fittings, or basic lighting kits.
- Online Marketplaces: eBay, Etsy, or Amazon often have affordable craft supplies.
- Dollar Stores: Great for small decorative items like beads or twine.
- Nature: Collect driftwood, stones, or branches for free (with permission, if needed).
Benefits of DIY Statement Lighting
Choosing to make your own statement lighting offers numerous advantages:
- Cost Savings: DIY projects are significantly cheaper than store-bought fixtures, which can cost hundreds or thousands of dollars.
- Customization: Tailor designs to match your decor perfectly.
- Sustainability: Upcycling reduces waste and promotes eco-friendly design.
- Personal Satisfaction: Creating something unique with your hands is incredibly rewarding.
Common Mistakes to Avoid
To ensure your project is a success, steer clear of these pitfalls:
- Overcomplicating the Design: Start simple, especially if you’re a beginner.
- Ignoring Safety: Always prioritize electrical safety and proper installation.
- Using Low-Quality Materials: Cheap materials can look tacky or wear out quickly.
- Skipping Measurements: Ensure your fixture fits the space and meets your lighting needs.
Inspiration for Advanced DIY Lighting Projects
Once you’ve mastered the basics, try these advanced ideas to make your own statement lighting:
- Vintage Suitcase Chandelier: Turn an old suitcase into a quirky light fixture by adding LED strips inside.
- Wine Bottle Pendant Cluster: Cut and polish wine bottles to create a series of glowing pendants.
- Macrame Wall Sconce: Combine macrame knots with fairy lights for a bohemian wall accent.
- Concrete Table Lamp: Mold concrete into a sleek base for a modern, industrial look.
Conclusion
Creating your own statement lighting is an accessible, rewarding way to enhance your home’s decor without spending a fortune. By choosing to make your own statement lighting, you can craft unique, personalized fixtures that reflect your style and budget. Whether you opt for a rustic mason jar chandelier, a bohemian rope pendant, an industrial pipe lamp, a natural driftwood fixture, or a modern geometric pendant, the possibilities are endless. With careful planning, affordable materials, and a touch of creativity, you can transform any space into a beautifully lit haven.